Dưới đây là các ghi chú của mình trong quá trình cài đặt được hướng dẫn trong Clip.

——————-
SETUP LAMP ON AMAZON EC2 INSTANCE
——————————
STEP 1:
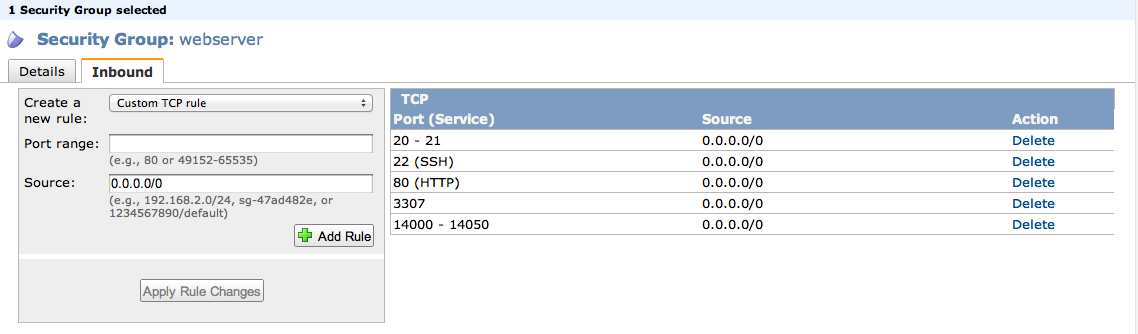
- Setup EC2 instance with Linux 64bit AMI (Create new Security Group with following photo)
- Save permission file (private key file) to secret location, remove “other” permission for this file (because of security) and keep carefully.
- Allocate Elastic IP Address and assign to EC2 Instance
- SSH To EC2 Instance
STEP 2:
- Install Apache + Edit Httpd.conf, vhost.conf
- Install PHP + Edit php.ini
- Install MySQL
- Install PhpMyAdmin
- Install Vsftpd + Edit vsftpd.conf
STEP 3:
- Take a drink.
===============================================
Note:
- Security Group setting:
#SSH to EC2 instance
ssh -i /path/to/private_key.pem
[email protected]
#change permission of private key file (.pem) downloaded from amazon (600)
sudo chmod 600 /path/to/private_key.pem
#Update YUM for latest package:
sudo yum -y update
——————————–
#Install MySQL server
sudo yum install mysql-server mysql
# Start mysql server
sudo /etc/init.d/mysqld start
# Set root password for MySQL (Choose a strong one if the
# MySQL TCP port is going to be left open.)
mysqladmin -u root password
=====================
= for security, we need to create other mysql user for our web project
=====================
# create new mysql account
mysql -u root -p
#after login to mysql
#create database
CREATE DATABASE mydatabase;
#create new user, password and assign all priviledge for this new user for only one selected database
GRANT ALL ON mydatabase.* TO newusername@localhost IDENTIFIED BY ‘mypassword’;
#now, you can use new mysql account and new database for your project
—————
#install Apache
sudo yum install httpd
#And then start apache with command:
sudo service httpd start
———-
NOW, can connect with browser to
http://youripaddress/ to check apache running
——–
#install PHP
sudo yum install php php-common libmcrypt libmcrypt-devel php-mcrypt php-mbstring php-pear php-gd php-pear php-devel php-xml php-mysql php-pdo
#After which we’ll want to restart Apache:
sudo service httpd restart
#create phpinfo() to check installed php
#create new file on web server
sudo vi /var/www/html/phpinfo.php
#Learn more about vi command here:
http://www.lagmonster.org/docs/vi.html
#in vi editor, type anycharacter to turn on — INSERT — mode
#type the content for this file
<?php
phpinfo();
#press ESC to exit INSERT mode
#type :wq and [ENTER] to save this file and exit vi editor.
———-
NOW, can connect with browser to
http://youripaddress/phpinfo.php to check php information.
——–
#enable htaccess (for Rewrite URL) of current working www
#by default, the web home directory can not use .htaccess for rewrite url even the mod_rewrite had been enable (by default also). (Check mod_rewrite enable or not at httpd.conf file, the line
LoadModule rewrite_module modules/mod_rewrite.so
#must not have the pound ‘#’ character at the beginning)
#If your www directory is at “/var/www/html”, you need to open the apache httpd.conf (maybe in /etc/httpd/conf/httpd.conf) and change:
<Directory “/var/www/html”>
…
AllowOverride None
….
</Directory>
to
<Directory “/var/www/html”>
…
AllowOverride All
….
</Directory>
#restart apache
sudo service httpd restart
==========
#Install phpmyadmin
#Check documentRoot (usally /var/www/html/)
# to check the document Root, run the command “grep documentRoot /etc/httpd/conf/httpd.conf”
#Download latest PhpMyadmin (this example is 3.3.9.1)
sudo wget
http://sourceforge.net/projects/phpmyadmin/files/phpMyAdmin/3.3.9.1/phpMyAdmin-3.3.9.1-all-languages.tar.gz
#untar downloaded .gz file
sudo tar -xzvf phpMyAdmin-3.3.9.1-all-languages.tar.gz -C /var/www/html
#move to webroot
cd /var/www/html
#rename phpmyadmin directory
sudo mv phpMyAdmin-3.3.9.1-all-languages phpmyadmin
#create config file
cd /var/www/html/phpmyadmin
sudo cp config.sample.inc.php config.inc.php
#edit config file
sudo vi config.inc.php
#set blowfish_secret variable.
$cfg['blowfish_secret'] = ‘yoursecretstring’;
#save and exit vi editor.
ESC,
:wq
[ENTER]
=====================
= FTP SERVER INSTALLATION
=====================
#install vsftpd
sudo yum install vsftpd
#disable anonymous FTP user by editing file “/etc/vsftpd/vsftpd.conf”
sudo vi /etc/vsftpd/vsftpd.conf
anonymous_enable=YES
-> anonymous_enable=NO
#uncomment this line (default)
local_enable=YES
#add more setting for passive mode on FTP client connection
pasv_enable=YES
pasv_min_port=14000
pasv_max_port=14050
port_enable=YES
#if you have assigned Elastic IP Address to your Instance
pasv_address=72.44.42.109
pasv_addr_resolve=NO
#or if you use default Public DNS of Instance
pasv_address=ec2-72-44-42-109.
compute-1.amazonaws.com
pasv_addr_resolve=YES
#start(or restart) vsftpd
sudo service vsftpd start
#edit Security Group inbound of current instance security group
#add port range 20-21 and 14000-14050 to allow connection in FTP
#we need to create a FTP user login
sudo useradd -d /var/www/html -G apache ftpuser
sudo passwd ftpuser
sudo chown -R ftpuser /var/www/html
sudo chmod 775 /var/www/html
 ——————-
SETUP LAMP ON AMAZON EC2 INSTANCE
——————————
STEP 1:
- Setup EC2 instance with Linux 64bit AMI (Create new Security Group with following photo)
- Save permission file (private key file) to secret location, remove “other” permission for this file (because of security) and keep carefully.
- Allocate Elastic IP Address and assign to EC2 Instance
- SSH To EC2 Instance
STEP 2:
- Install Apache + Edit Httpd.conf, vhost.conf
- Install PHP + Edit php.ini
- Install MySQL
- Install PhpMyAdmin
- Install Vsftpd + Edit vsftpd.conf
STEP 3:
- Take a drink.
===============================================
Note:
- Security Group setting:
——————-
SETUP LAMP ON AMAZON EC2 INSTANCE
——————————
STEP 1:
- Setup EC2 instance with Linux 64bit AMI (Create new Security Group with following photo)
- Save permission file (private key file) to secret location, remove “other” permission for this file (because of security) and keep carefully.
- Allocate Elastic IP Address and assign to EC2 Instance
- SSH To EC2 Instance
STEP 2:
- Install Apache + Edit Httpd.conf, vhost.conf
- Install PHP + Edit php.ini
- Install MySQL
- Install PhpMyAdmin
- Install Vsftpd + Edit vsftpd.conf
STEP 3:
- Take a drink.
===============================================
Note:
- Security Group setting:
 #SSH to EC2 instance
ssh -i /path/to/private_key.pem [email protected]
#change permission of private key file (.pem) downloaded from amazon (600)
sudo chmod 600 /path/to/private_key.pem
#Update YUM for latest package:
sudo yum -y update
——————————–
#Install MySQL server
sudo yum install mysql-server mysql
# Start mysql server
sudo /etc/init.d/mysqld start
# Set root password for MySQL (Choose a strong one if the
# MySQL TCP port is going to be left open.)
mysqladmin -u root password
=====================
= for security, we need to create other mysql user for our web project
=====================
# create new mysql account
mysql -u root -p
#after login to mysql
#create database
CREATE DATABASE mydatabase;
#create new user, password and assign all priviledge for this new user for only one selected database
GRANT ALL ON mydatabase.* TO newusername@localhost IDENTIFIED BY ‘mypassword’;
#now, you can use new mysql account and new database for your project
—————
#install Apache
sudo yum install httpd
#And then start apache with command:
sudo service httpd start
———-
NOW, can connect with browser to http://youripaddress/ to check apache running
——–
#install PHP
sudo yum install php php-common libmcrypt libmcrypt-devel php-mcrypt php-mbstring php-pear php-gd php-pear php-devel php-xml php-mysql php-pdo
#After which we’ll want to restart Apache:
sudo service httpd restart
#create phpinfo() to check installed php
#create new file on web server
sudo vi /var/www/html/phpinfo.php
#Learn more about vi command here: http://www.lagmonster.org/docs/vi.html
#in vi editor, type anycharacter to turn on — INSERT — mode
#type the content for this file
<?php
phpinfo();
#press ESC to exit INSERT mode
#type :wq and [ENTER] to save this file and exit vi editor.
———-
NOW, can connect with browser to http://youripaddress/phpinfo.php to check php information.
——–
#enable htaccess (for Rewrite URL) of current working www
#by default, the web home directory can not use .htaccess for rewrite url even the mod_rewrite had been enable (by default also). (Check mod_rewrite enable or not at httpd.conf file, the line
LoadModule rewrite_module modules/mod_rewrite.so
#must not have the pound ‘#’ character at the beginning)
#If your www directory is at “/var/www/html”, you need to open the apache httpd.conf (maybe in /etc/httpd/conf/httpd.conf) and change:
<Directory “/var/www/html”>
…
AllowOverride None
….
</Directory>
to
<Directory “/var/www/html”>
…
AllowOverride All
….
</Directory>
#restart apache
sudo service httpd restart
==========
#Install phpmyadmin
#Check documentRoot (usally /var/www/html/)
# to check the document Root, run the command “grep documentRoot /etc/httpd/conf/httpd.conf”
#Download latest PhpMyadmin (this example is 3.3.9.1)
sudo wgethttp://sourceforge.net/projects/phpmyadmin/files/phpMyAdmin/3.3.9.1/phpMyAdmin-3.3.9.1-all-languages.tar.gz
#untar downloaded .gz file
sudo tar -xzvf phpMyAdmin-3.3.9.1-all-languages.tar.gz -C /var/www/html
#move to webroot
cd /var/www/html
#rename phpmyadmin directory
sudo mv phpMyAdmin-3.3.9.1-all-languages phpmyadmin
#create config file
cd /var/www/html/phpmyadmin
sudo cp config.sample.inc.php config.inc.php
#edit config file
sudo vi config.inc.php
#set blowfish_secret variable.
$cfg['blowfish_secret'] = ‘yoursecretstring’;
#save and exit vi editor.
ESC,
:wq
[ENTER]
=====================
= FTP SERVER INSTALLATION
=====================
#install vsftpd
sudo yum install vsftpd
#disable anonymous FTP user by editing file “/etc/vsftpd/vsftpd.conf”
sudo vi /etc/vsftpd/vsftpd.conf
anonymous_enable=YES
-> anonymous_enable=NO
#uncomment this line (default)
local_enable=YES
#add more setting for passive mode on FTP client connection
pasv_enable=YES
pasv_min_port=14000
pasv_max_port=14050
port_enable=YES
#if you have assigned Elastic IP Address to your Instance
pasv_address=72.44.42.109
pasv_addr_resolve=NO
#or if you use default Public DNS of Instance
pasv_address=ec2-72-44-42-109.compute-1.amazonaws.com
pasv_addr_resolve=YES
#start(or restart) vsftpd
sudo service vsftpd start
#edit Security Group inbound of current instance security group
#add port range 20-21 and 14000-14050 to allow connection in FTP
#we need to create a FTP user login
sudo useradd -d /var/www/html -G apache ftpuser
sudo passwd ftpuser
sudo chown -R ftpuser /var/www/html
sudo chmod 775 /var/www/html
#SSH to EC2 instance
ssh -i /path/to/private_key.pem [email protected]
#change permission of private key file (.pem) downloaded from amazon (600)
sudo chmod 600 /path/to/private_key.pem
#Update YUM for latest package:
sudo yum -y update
——————————–
#Install MySQL server
sudo yum install mysql-server mysql
# Start mysql server
sudo /etc/init.d/mysqld start
# Set root password for MySQL (Choose a strong one if the
# MySQL TCP port is going to be left open.)
mysqladmin -u root password
=====================
= for security, we need to create other mysql user for our web project
=====================
# create new mysql account
mysql -u root -p
#after login to mysql
#create database
CREATE DATABASE mydatabase;
#create new user, password and assign all priviledge for this new user for only one selected database
GRANT ALL ON mydatabase.* TO newusername@localhost IDENTIFIED BY ‘mypassword’;
#now, you can use new mysql account and new database for your project
—————
#install Apache
sudo yum install httpd
#And then start apache with command:
sudo service httpd start
———-
NOW, can connect with browser to http://youripaddress/ to check apache running
——–
#install PHP
sudo yum install php php-common libmcrypt libmcrypt-devel php-mcrypt php-mbstring php-pear php-gd php-pear php-devel php-xml php-mysql php-pdo
#After which we’ll want to restart Apache:
sudo service httpd restart
#create phpinfo() to check installed php
#create new file on web server
sudo vi /var/www/html/phpinfo.php
#Learn more about vi command here: http://www.lagmonster.org/docs/vi.html
#in vi editor, type anycharacter to turn on — INSERT — mode
#type the content for this file
<?php
phpinfo();
#press ESC to exit INSERT mode
#type :wq and [ENTER] to save this file and exit vi editor.
———-
NOW, can connect with browser to http://youripaddress/phpinfo.php to check php information.
——–
#enable htaccess (for Rewrite URL) of current working www
#by default, the web home directory can not use .htaccess for rewrite url even the mod_rewrite had been enable (by default also). (Check mod_rewrite enable or not at httpd.conf file, the line
LoadModule rewrite_module modules/mod_rewrite.so
#must not have the pound ‘#’ character at the beginning)
#If your www directory is at “/var/www/html”, you need to open the apache httpd.conf (maybe in /etc/httpd/conf/httpd.conf) and change:
<Directory “/var/www/html”>
…
AllowOverride None
….
</Directory>
to
<Directory “/var/www/html”>
…
AllowOverride All
….
</Directory>
#restart apache
sudo service httpd restart
==========
#Install phpmyadmin
#Check documentRoot (usally /var/www/html/)
# to check the document Root, run the command “grep documentRoot /etc/httpd/conf/httpd.conf”
#Download latest PhpMyadmin (this example is 3.3.9.1)
sudo wgethttp://sourceforge.net/projects/phpmyadmin/files/phpMyAdmin/3.3.9.1/phpMyAdmin-3.3.9.1-all-languages.tar.gz
#untar downloaded .gz file
sudo tar -xzvf phpMyAdmin-3.3.9.1-all-languages.tar.gz -C /var/www/html
#move to webroot
cd /var/www/html
#rename phpmyadmin directory
sudo mv phpMyAdmin-3.3.9.1-all-languages phpmyadmin
#create config file
cd /var/www/html/phpmyadmin
sudo cp config.sample.inc.php config.inc.php
#edit config file
sudo vi config.inc.php
#set blowfish_secret variable.
$cfg['blowfish_secret'] = ‘yoursecretstring’;
#save and exit vi editor.
ESC,
:wq
[ENTER]
=====================
= FTP SERVER INSTALLATION
=====================
#install vsftpd
sudo yum install vsftpd
#disable anonymous FTP user by editing file “/etc/vsftpd/vsftpd.conf”
sudo vi /etc/vsftpd/vsftpd.conf
anonymous_enable=YES
-> anonymous_enable=NO
#uncomment this line (default)
local_enable=YES
#add more setting for passive mode on FTP client connection
pasv_enable=YES
pasv_min_port=14000
pasv_max_port=14050
port_enable=YES
#if you have assigned Elastic IP Address to your Instance
pasv_address=72.44.42.109
pasv_addr_resolve=NO
#or if you use default Public DNS of Instance
pasv_address=ec2-72-44-42-109.compute-1.amazonaws.com
pasv_addr_resolve=YES
#start(or restart) vsftpd
sudo service vsftpd start
#edit Security Group inbound of current instance security group
#add port range 20-21 and 14000-14050 to allow connection in FTP
#we need to create a FTP user login
sudo useradd -d /var/www/html -G apache ftpuser
sudo passwd ftpuser
sudo chown -R ftpuser /var/www/html
sudo chmod 775 /var/www/html